


If you are anything like us then you will have a large number of scraps in your stash and it can sometimes be challenging to come up with ideas to use them.
Making string quilts is an ideal way of using up those scraps, and these quilts not only look awesome they are easy to make and they will make a dent in that stash.
We sew the strips directly onto our batting which gives the quilt a nice firm foundation.
The one in this tutorial was finished by ditch stitching in the seam lines, but you can free-motion quilt if you prefer. Whichever method you use, your string quilt will look just gorgeous.
Watch the video tutorial below or scroll down for the written instructions
How to Make a String Quilt Block
What You Need
- Lots of scrappy strips of material in assorted sizes from your stash or you can use jelly roll strips if you want the strips to be the same size.
- Batting – Decide on the size of your blocks and cut a piece of batting slightly wider all round than what you want your finished square to be. You can trim your block once you finish adding the strips.
- I made my squares 10″, so I cut my batting at 11″ to allow for trimming and straightening of the block.
TOOLS USED
You can check the latest prices at Amazon by clicking on the links below:
- Quilter’s Slidelock Ruler
- Creative Grids Ruler 8½” x 24½”
- Olfa 24″ x 36″ double sided healing mat
- Olfa 60mm rotary cutter
- Oliso Iron
- Gutermann Sew All thread
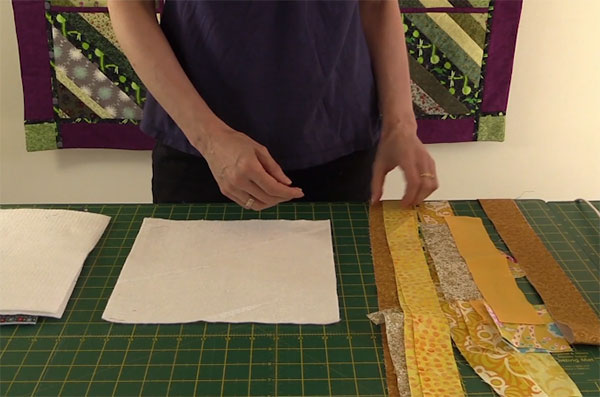
- Take one square of batting and place your first strip right side up, and going from corner to corner.

- Take your 2nd strip and place it face down over the first strip making sure the two strips match along one edge. Now sew the two strips together at one edge using ¼” seam allowance.

- Press the seam.
- Open the strips and press flat.

- Add the next strip placing it face down over the first strip and sew the two strips together with a ¼” seam.

- Press open the seam and continue adding strips until the square of batting is covered.

- Turn the finished square over and trim. Our batting didn’t stretch or distort, and we decided that we were happy with the size, so we just trimmed around the edge of the batting. You can trim the square to suit whatever size you want as long as the finished squares are all the same size.


- Continue in this way until you have covered each of the batting squares. This is the end of part 1.
For the written instructions for Part 2 click here


Elaine Smith says
we are teaching Sudanese refugees in our sewing group to make quilts like this. Look fabulous and they love them.
Alanda says
We are so glad that our tutorials are able to help with such a worthwhile cause. Thank you for letting us know Elaine, we certainly appreciate the feedback.
Mary Hickey says
This is a great project when you have time on you hands, and not in a hurry. They never look the same. This is why they are so beautiful!
Alanda says
We love them too Mary. Its so exciting to lay out some scraps and turn them into something useful and pretty.
Lucy says
I absolutely loved this tutorial! It makes quilting go faster.. Very clear instructions and you make it look so easy! I’m going to start one very soon since I have so many fabric scraps. Thank you and I’ll look forward to more of your tutorials.
Alanda says
Thank you for your lovely comments Lucy. You are going to be amazed at just how easy this comes together. Please share your finished quilt photos with us. Here is the link https://www.alandacraft.com/submit-your-project/.
We love seeing our readers finished projects.
Aida Celia Heaton says
Thank you so much ,for my request . I love your Country my best friend is from Adeline, I am from Mexico City . It is great to know Ladies like you teaching all this wonderful things.I live in Phoenix Arizona. Watching the tutorial how to make a string quilt ,you were using a tool to guide when cutting the material using the rotary.It was a long rule with a grip handle on top. It is a trim guard,.edger,cutting guard or trimmer guide? I loved it .I would like to buy one . Thank you
If you please can get the information. Love Aida
Alanda says
Hi Aida lovely to hear from you. I have to say the Quilters Slidelock ruler is awesome. We use it all the time and you can read the review on our website https://www.alandacraft.com/quilters-slidelock-demonstration/. We don’t stock these rulers but they are available directly from Quilters Slidelock http://quiltersslidelock.com/
Just to let you know, we don’t receive any commission for recommending these rulers but are happy to promote them simply because of how great they are.
Gerry LawsonStewart says
Thank you for these great ideas. Do you have any suggestions to use up 4” squares of quilt batting ? I have a box of about 200 of them. Would appreciate any suggestions you might have
.
Gerry
Alanda says
Here are a few ideas for you:
1. Rag Quilt – https://www.alandacraft.com/2016/02/27/easiest-ever-rag-quilt-tutorial/
2. Reversible Quilt as You Go – https://www.alandacraft.com/2017/05/16/quilt-as-you-go-quilt-with-sashing/
3. Rag Bag Tutorial – search Google for this one using the keywords “rag bag tutorial”.
4. Make some coasters
5. You could also cut some 4″ fabric squares and use adhesive spray to adhere the material to the batting.Then sew the squares together to form strips of fabric or a fabric square. The squares will be padded and you can make a number of projects from them. Then you will just need to add a lining.
Vicki says
Where did you get your slide ruler with the handle. Love the quilt.
Alanda Craft says
That is called a Quilters Slidelock. You can read our review for it here: https://www.alandacraft.com/2014/08/16/quilters-slidelock-demonstration/
Elsie Wilsey says
How do I get printed copies of 1&2?
Alanda Craft says
Hi Elsie, At the bottom of each post there is a PDF download and a print icon. Just click on the PDF icon and it should download to your computer.