

These table runners make great gifts and are ideal if you need to dress up a Christmas table or Thanksgiving spread. These are quite easy to make so would suit a beginner. As long as you know how to use your sewing machine and sew a straight line, you should be able to tackle this one.
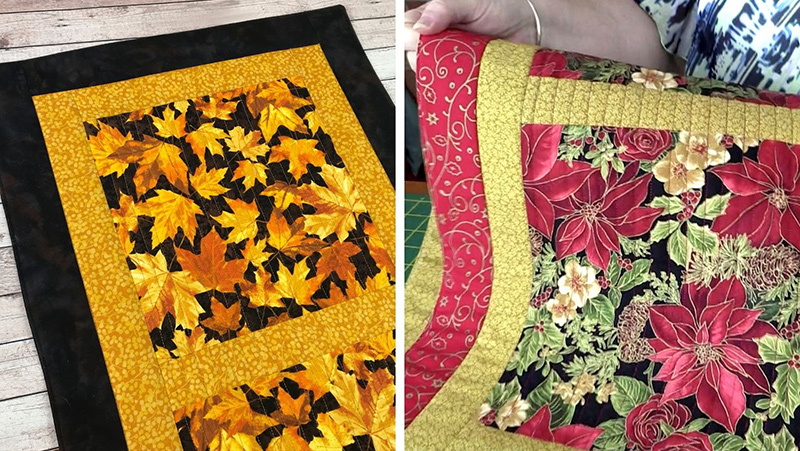
The table runner measures approximately 16½” x 38½” – finished size
What You Need:
Feature Squares: (1/2 yard)
- 3 pcs @ 10″ x 10″
Sashing: (1/4 yard)
- 4 pcs @ 2″ x 10″
- 2 pcs @ 2″ x 35″
Borders: (1/2 yard)
- 2 pcs @ 2½” x 13″
- 2 pcs @ 2½” x 39″
Backing: (1/2 yard)
- 1 pc 39″ x 17″
Batting:
- 1 pc 39″ x 17″
Please Note: In the video I stated that the border pieces measure 39½. They should be 39″. I do apologise for this error.

Watch the video below or scroll down for the step-by-step written instructions
TOOLS USED IN THIS TUTORIAL
You can check the latest prices at Amazon by clicking on the links below:
- Creative Grids Ruler 8½” x 24½”
- Olfa 24″ x 36″ double-sided healing mat
- Olfa 60mm rotary cutter
- Oliso Iron
- Gutermann Sew-All thread
Method:
- Lay the 10″ squares on the mat.
- Place the sashing, right sides together, on top of the square and sew down the edge with a ¼” seam.
- Do this with each square.
- On the last square, sew a piece of sashing down two sides.
- Note: We ironed our seams towards the square.
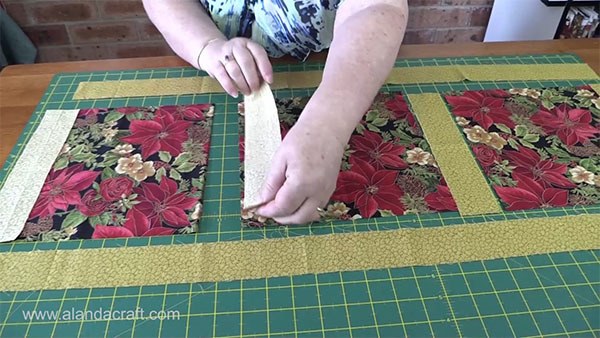

- Now join all three squares together.
- It should look like the image below.

- Attach one of the long strips of sashing to one long edge of the center piece and pin in place.

- Repeat with the other edge.
- Sew along each edge with a ¼” seam.

- Take one of the short border pieces and lay it along the short edge of the piece, with right sides together.
- Sew along the edge with a ¼” seam.

- Do the same on the other short edge.
- Sew with a ¼” seam.

- Take one of the longer pieces of the border, lay it right sides together down the long edge of the centerpiece and pin in place.
- Sew with a ¼” seam.

- Repeat with the other edge.

- This will complete the top of the table runner.
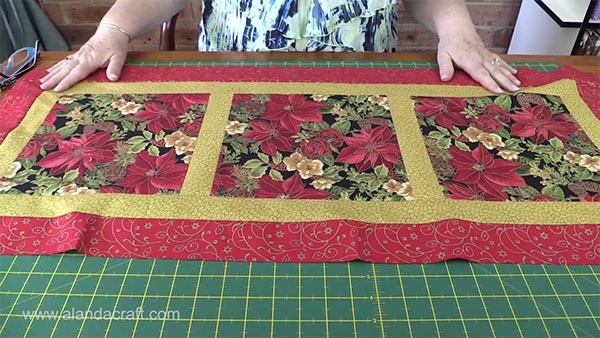
- NOTE: At this point, you could finish this table runner in the traditional way by adding your batting and backing, quilting it and then attaching binding.
However, if you would rather not use a binding, then continue on with the next set of steps.
- Now we need to create a quilt sandwich.
- Start by laying the batting on the mat.
- Place the quilt top face up on top of the batting.
- Then place the backing fabric face down on top of the quilt top.


- Pin around the edges to secure everything in place.
- Ensure you leave an opening of about 5″ at the end of one side of the table runner so that you can turn it through. You can use pins to mark this opening or make a mark with a fabric pen.

- Start at one side of the opening and backstitch.
- Sew around the entire runner until you come to the pin or mark for the other side of the opening. Backstitch.
- The opening should look like this once everything is sewn.

- At this point, we need to trim the corners of the quilt, but it is always a good idea to turn it through first just to check that everything has caught nicely in the seams. Once you are happy with the result, you can turn the runner back through the hole and trim those corners.

- Turn the table runner through the hole.


- Press the runner, making sure to press in the edges of the opening.

- Topstitch all the way around the runner approx 1/8″ in from the edge.

Now We are Ready to Quilt:
- Starting at one corner between the border and the sashing, do a small backstitch or tie of the threads and stitch in the ditch all around the seam line.
- End with a back stitch or again, tie off the threads.

- Now stitch in the ditch down the two side seams.

- We are going to simply line quilt the runner through the squares, so decide how far apart you want your lines to be and it is preferable to draw the lines on the runner.
- Start in the top of one square and stitch down to the end of the last square.
- Leave your needle in the down position and pivot the runner as you get to the end of each line.
- Continue doing this until you have all your lines sewn.
- End with a backstitch or tie off your threads.

- Give the table runner a good press and it is ready.


Vera says
Loved the video, very easy to follow and understand. I’ve got my fabric and ready to cut, pi ce sew, and quilt. ho hope th finished product looks good.
Alanda says
That’s awesome Vera. You are going to love how easy this goes together. And we would love to see photos of your runner when it is finished. If you would like to share some photos, here is the link to our readers page https://www.alandacraft.com/submit-your-project/. Happy quilting
Mike says
I have done 2 of these, and ready to start my 3rd, but going to adjust to 4 panels of 10. I am a new quilter, and I am so excited to have these projects be my “training”. Your easy to follow directions are perfect for beginners. AlandaCraft is amazing!!
Alanda says
Thank you for your lovely comment Mike. Your runner looks lovely. We have included it on the Readers Project page.
Donna says
I made one and was very simple. Thank you for the great instructions and video to follow. Many a gift next year for folk!
Alanda says
Thank you Donna. Perhaps you would like to share some photos on our Readers Project page. https://www.alandacraft.com/submit-your-project/. I think they make excellent gifts.
Karen Hopkins says
Im just finishing the runner and wondering about quilting it after using the NON binding method. Will it pucker in the body of the quilt if I do it ? Ive done other projects with the turm method and they puckered ( for short of another way to explain, sorry)
Alanda says
If you plan to do lot of quilting on a project that has been made using the turn method there can be a tendency for it pucker. This is because the quilting draws in the quilt. I tend to do linear quilting (basic straight lines or stitch in the ditch) or a very open pattern. Using a temporary spray such as 505 and pinning the quilt to within an inch of its life will also help to stop puckering.
Karen Hopkins says
I went ahead and just stitched around the squares using my walking foot. I used fusible fleece as I didnt have any batting. It still wasnt smooth but it ended up better. Thanks for the easy tutorial.
Alanda says
Would love to see the result Karen. Here is a link to the Readers Project Page if you would like to share some photos with us. https://www.alandacraft.com/submit-your-project/. Stitching around the squares is a good idea and finishes the runner of nicely. 🙂
Michele Rader says
Perhaps a larger stitch or a walking foot will help reduce puckering.
Elizabeth Beckler says
I have just one strip of Christmas pattern 591/2 by 13 in wide all over poinsetta pattern. I wouldn’t have to cut it in strips, just want to put the batting on the reverse side and a backing.
Does that sound feasable?
Alanda says
You can certainly do that Elizabeth. Just cut the batting and the backing a few inches larger than the finished size of your fabric and finish it off with some quilting and binding. Some fabric is just too pretty to cut up into squares, strips etc so it’s good to be able to use them in one piece.
Sue P says
I attempted this and ended up with a runner 14×34. I followed all the 1/4” seams. Where did I go wrong?
Sue P says
Whoops! Never mind! Measured wrong,
Alanda says
lol, that’s easy done.
Diane Carriere says
Fantastic tutorial Alana especially the no binding part luv it I enjoy your videos and tutorial so much
Alanda says
Thank you for your lovely comment Diane. Happy to hear you like the tutorials. 🙂
Char says
Love this easy table runner. Thanks for the easy to follow instructions.
Alanda says
Happy to hear that you like the table runner, Char. They are so quick and easy to make.
Audrey Derby says
Love ALL your instructions and videos! So precise and easy to follow. Thank you!
Alanda Craft says
Thank you for your lovely comment Audrey. Happy to hear that you enjoy our tutorials 🙂
Louise Hodgins says
You were wonderful in every way. The runner is gorgeous and I enjoyed your lovely presentation.
Alanda Craft says
Thank you so much for your lovely comment Louise. 😊
Jenny Solka says
If I wanted to use 4 blocks instead of 3, what would my measurements be? I’m not god at figuring that out lol
Thanks
Jenny
Alanda Craft says
Hi Jenny, Just add a 4th block in the same way the first three were joined. Then measure how long your piece is, and cut the side borders to that size. The side borders are the only change you will need to make on the front. Then you will need to cut your batting and backing to the size of the front piece.
Carol Reynolds says
Your pattern looks so easy. I’m excited to try one. I’m always looking for someone to show me new patterns.. I’m a new quilter. I can’t wait to do this.
Thank you
Alanda Craft says
We personally love ‘easy’ which is why we focus on these types of tutorials. I love all the complex stuff that people do, but I must admit that for me (and this is Paula speaking), I get bored fast and want to move on to the next thing so anything long-winded and complicated tends to sit in the unfinished project pile.
Helen says
Thank you for the tutorial on the Christmas runner it was very informative and made it look easy
Alanda Craft says
Thank you Helen.
Elizabeth Bennett says
I couldn’t find the thumbs up but I really enjoyed your tutorial. So easy and great instructions!
Beth Bennett
Joyce says
I’m looking to hand piece a Christmas table runner. I’ve never done one before but I was wonder is this pattern is one that could be stitched by hand. I would knot it instead of quilting it to finish it. Can you tell me if this is possible.
Alanda Craft says
I can see no reason why you can’t hand stitch this table runner Joyce. I just find machine sewing projects is quicker and easier for me, I’m not much on hand sewing. I certainly admire all of you quilters who hand stitch your projects 😊
Joanne Orzech says
I made this with the same square fabric, but I used black for the Sashing and it’s very dramatic. I love it.
Alanda Craft says
I would love to see your table runner with the black sashing. Perhaps you would like to share some photos with us Joanne. Here is a link if you are interested https://www.alandacraft.com/submit-your-project/
Terri Salmasi says
So easy to understand! I am going to start on this immediately! Thank you!
Alanda Craft says
Excellent Terri 😊. I’m glad to hear that you enjoy the tutorial.
Linda Ruddock says
I am so excited to try this. Your tutorial was very informative and had easy to follow instructions.
You have my thimbs up. 👍
Alanda Craft says
Thank you you Linda 😊.
Mary Anne says
You did this table runner back in 2016 and here it is 2024 and I just happened upon your site. Went in search of an easy Christmas table runner and your site was one of them that popped up. Am so glad it did. Bought 2 Christmas fat quarters back in summer and I didn’t want to cut them up so much. Your table runner is perfect for this! Thank you so much!!!
Alanda Craft says
That’s excellent to hear Mary Anne 😊. I’m really glad you found us as well. These table runners are pretty much timeless and can easily be given a different look just by changing the fabric used.
Alanda Craft says
That’s excellent to hear Mary Anne 😊. We’re happy that you found us as well.
Susanne says
Agree with all these comments. A wonderful tutorial for newbies to sewing & quilting , and very clear instruction. Thankyou so much.
Alanda Craft says
Thank you Susanne 😊, I’m glad you like the tutorial.
Jen says
Very informative tutorial. Thank you!
Alanda Craft says
Thank you Jen.