


We’ve been meaning to create a zippered cushion cover tutorial for some time now. We have had so many requests for it and this zippered cushion is super easy to make. Even if you have never inserted a zip before, you should be able to do this.
The cushion cover shown in the video is for an 18″ cushion insert. See the chart below for fabric and zip requirements for other sized cushion inserts.
- You can make these cushion covers with a matching front and back, a contrasting back and directional print. You can even fussy cut to get the effect you want.
- Take care to make sure the pattern on both pieces is facing the same way if you are using a directional print.
Watch the video tutorial below or scroll down for the written instructions
| Cushion Insert | Fabric Needed | Zip Size |
|---|---|---|
| 20" | 2 pcs @ 19" x 19" | 17" or longer |
| 18" | 2 pcs @ 17" x 17" | 15" or longer |
| 16" | 2pcs @ 15" x 15" | 13" or longer |
| 14" | 2 pcs @ 13" x 13" | 11" or longer |
| 12" | 2 pcs @ 11" x 11" | 10" or longer |
Materials
- Decide which size cushion cover you are going to make and cut your fabric according to the chart above.
- The material used for our cushion covers was purchased from Spotlight in Australia and is no longer available.
TOOLS USED IN THIS TUTORIAL
You can check the latest prices at Amazon by clicking on the links below:
- Creative Grids Ruler 8½” x 24½”
- Olfa 24″ x 36″ double-sided healing mat
- Olfa 60mm rotary cutter
- Gutermann Sew-All thread
- Dritz Marking Chalk Wheel I love this little gadget
Here are a couple of ideas for pillow inserts you can use.
You can use the Make-A-Zipper zips or you can use individual zips
I used a continuous zip using a Make-A-Zipper Kit. These are so handy to have as you don’t have to worry about getting just the right size zipper for your needs.

Method:
- Decide which is going to be the bottom edge of the cushion cover. This is where the zipper will be placed.
- If you are using a directional print, ensure that you place both pieces in the same direction.
- Fold over ½” on the bottom edge of each piece of fabric.
- Press to create a crease.
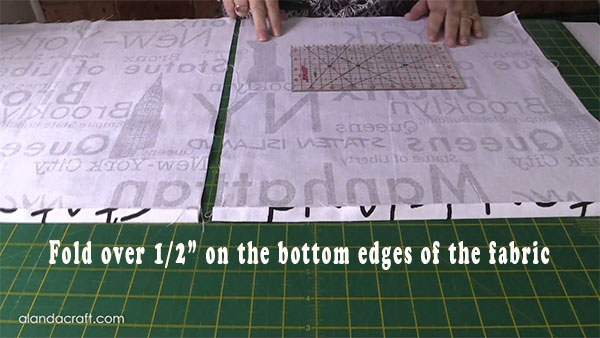
- Open up the creased edges on both pieces of fabric.
- On the fold line, measure in 2″ in from the edge on each side of the square (This is only needed on one piece of fabric).

- Place the two pieces of fabric with right sides together.

- Place the two pieces of fabric, right sides together with the folded edges matching.
- Put a pin at each end where the 2″ line is marked.

- Sew along the 2″ lines making sure to back stitch at the start and finish.

- Open up the two pieces.
- Place on the mat with the wrong sides facing up.
- Draw a line approx 1½” from each end. We do this so the zip doesn’t get caught in the seam line when we sew the two pieces of fabric together. We also don’t want the end of the zipper to come through the gap.
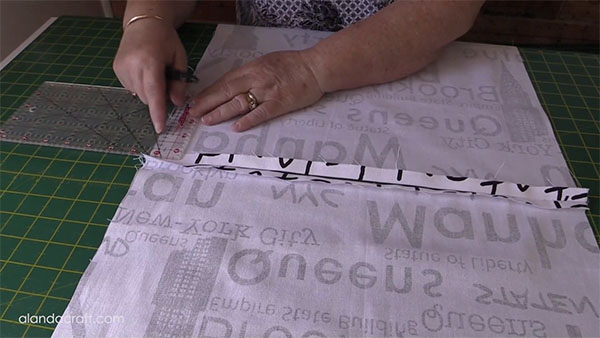
- Take your zip and place it with the zipper pull facing down in the gap.
- Line up the end of the zipper with the lines you drew at 1½” in from each edge.
- Pin the zip at one end.
- Smooth the zip along the folded edge of the open gap
- Trim the zip if it is too long or if you are using a continuous zip. You can find zippers by the yard on Amazon.
- Pin the end of the zip in place.

- Backstitch a few times over one end of the zip to hold it in place.
- Sew down one side, keeping the zip level with your ½” seam line.
- As you get to the zip pull, stop with the needle in the down position and maneuver the zip pull past the needle so that you have a nice flat sewing surface, and don’t break a needle.
- Backstitch a few times over the other end of the zip.
- Sew down the other side as before.
- Backstitch or tie off when you get back to where you started.

NOTE: This step is MOST IMPORTANT. Open the zip to about halfway or more.
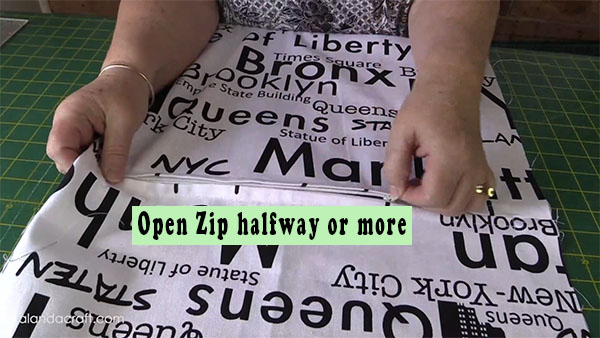
- Pin the two pieces of fabric with the right sides together.
- Sew around the edge with a ½” seam.
- Cushions get a lot of wear so I like to backstitch when I start and end at each corner.
- Turn the cushion through the zip opening.
- Push out the corners, you can trim the corners if you wish, I don’t usually bother on the cushion cover. It’s entirely up to you whether you do or you don’t. If you don’t trim the corners and you find it’s a bit bulky, you can always do it later.

- Insert your cushion insert, pushing it out to the corners.
- Do up the zip and there you are, all done.


Tina says
If you ever so slightly round the corners they don’t stick out like flappy ears! I tried it and the cushions look so much nicer!
Alanda says
Thank you for that tip Tina. Much appreciated. We will give that a go on the next lot of cushion covers we make. 🙂
Sue Meagan says
Thank you so much for this great tutorial- cushions came out beautifully 🙂
Alanda says
That is great to hear Sue. Perhaps you would like to share some photos of your cushion cover with us. We love seeing our Readers Projects. Here is the link in case you are interested https://www.alandacraft.com/submit-your-project/
Gareth Evans says
Hi, I’m a complete novice having a go in lockdown & wondered if you use a zipper foot or a conventional foot when sewing the zip? Kind Regards Gareth
Alanda Craft says
We used a regular foot for that but you can use a zipper foot if you prefer.
Gareth Evans says
Thank you.
Meagan Snuggs says
Hi
Very new to the sewing world and absolutely loving all the ideas that one can make whilst surviving lockdown.
Just a question on the measurements, 17” x 17” is that the finished size of the cushion or is that the size of the material you start with…
Warm regards
Alanda Craft says
That is the unfinished size, so you cut your square at 17″x17″. This creates a full, plump pillow.
Jo says
The choice of LIGHT fabric and zip made this tutorial easy on the eyes. I slowed the playback to .75 of the original so I could absorb the good information better. Thanks so much!
Alanda Craft says
Thank you for your comment Jo. Happy to hear you enjoyed the tutorial.
Jennifer says
Good Morning.
If I have a 25” cushion insert, should I use 2 24 inch panels of fabric? And what length zipper would you recommend?? Thank you.
Alanda Craft says
We haven’t made a 24″ cushion cover as yet, but following the formula on the blog post should work for this size. So yes, 24″ panels and a 21″ zip. But I can’t guarantee that will work as I haven’t made that size.
Priya says
I loved your video… but have a question:
If the insert is 18″, why is the fabric size 17″…??
Should it not be 18+ done buffer for the folds and sides…
Please advise..
Alanda Craft says
Doing it this way Priya, gives you a nice full cushion. This is how I do it, but you can always cut the fabric larger if you don’t want such a full cushion.
Naomi says
When you measure a pre-cut zip, is it the total length (ie including the tapes that run beyond the teeth) or just the functional part that you should be going by.?
Alanda Craft says
The zip measurement is just the functional part, Naomi. Take a closed zip and measure it from where the zipper pull ends (the top stop) to the metal stop at the bottom of the zip. The tape is just excess and is not measured as part of the zip.
Jeanene Crowell says
Thank you. This was the only website I found that stated where the zipper should be positioned on a cushion cover…bottom or side. Thank you for clearly stating the zipper should go on the bottom!!
Alanda Craft says
So glad we could help Jeanene.
Tara says
Thank you for the video it helped me so much in putting in my first zipper .
Alanda Craft says
I am so happy to hear that the tutorial was helpful Tara 😊.
Tracy ball says
This has been so helpful for me, I found it a couple of years ago and I live by these measurements for my cushion covers now, it’s so helpful to be able to go back on here for the step by step if I need to remind myself on what to do, thank you so much 🙂
Alanda Craft says
Thank you Tracy 😊. I’m so glad to hear that you like this tutorial.